Monday, April 21, 2008

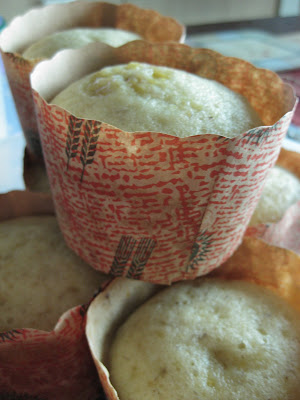
Egg White Pandan Cupcakes

these little egg white pandan cuppies were made in an attempt to use up the remaining egg whites i had in the freezer! i adapted the recipe from aunty yochana's egg white cheese cupcakes. replaced the 100 mL of fresh milk with 25 mL of pandan juice and 75 mL of coconut milk and added 1/2 tsp of pandan paste.

but mine sank a little after i took them out of the oven.


it tasted very light and soft, and i loved the pandan fragrance. you could make them in a larger size. i think these are a little too mini. haha.


the recipe uses a little amount of butter and no yolks. so i guess it's a rather healthy one :) do try it!

the exams are drawing near. so i won't be blogging for sometime. will be back after my papers end. yay i can't wait man :)

till then, take care :)

i'll be leaving for wyoming, yellowstone during the 3 months break this coming may for a work and travel program! really excited and looking forward to it. basically i'll be working in yellowstone for 2 months at xanterra national park and resort, then we'll be travelling for the remaining one month :) heh. any must go places anyone? please let me know okay :)

here's the modified recipe..

Egg White Pandan Cupcakes
Adapted from Aunty Yochana's Egg White Cheese Cupcakes

Ingredients:

25mL pandan juice
75mL coconut milk
1/2 tsp pandan paste
200 gm. egg white
1/4 tsp. salt
1/2 tsp. cream of tartar
80 gm. sugar
80 gm. cake flour
20 gm. cornflour
30 gm. melted butter

Method:

1. Mix the coconut milk, pandan juice and pandan paste together.
2. Whisk egg white, salt and cream of tartar till fluffy and pour in sugar gradually. Continue to whisk till thick.
3. Fold in coconut milk mixture, butter and flour using a spatula.
4. Spoon into muffin cups.
5. Bake at 180C for about 25 mins.

Saturday, April 19, 2008

Wholemeal Cinnamon Rolls


i got a little high on baking the other day...

haha. so...in sequel to the banana yoghurt bread and the mixed herbs wholemeal bread, i baked these cinnamon rolls too.

got the recipe from an ikea leaflet. replaced the plain flour with wholemeal flour and bread flour. the final product was rather dense. perhaps i shouldn't have replaced the flour. and maybe i shouldn't have 'crowded' them all together. not very sure if it will affect the proofing?


i spread the dough layer with butter, cinnamon, brown sugar then sprinkled mixed fruits on it.

the cinnamon smell was great though.


it wasn't a very successful bake i guess. notice how the standard of my bakes deteriorated as i proceeded. haha. packed most of the baked stuff for giveaway. it was way too much food ;p

Mixed Herbs Wholemeal Bread


this is a sequel to the the previous banana yoghurt bread post. in addition to that, i baked this too! also another recipe from kwf's blog. the bread didn't rise to as high as i wanted it to be. i baked it with the lid on, thinking that i could get a square loaf. but well, here's what i got :)


i added some chopped walnuts into the dough while rolling it up into a swiss roll.

the bread was soft but did not turn out as fluffy as wf's :(

so the winner for that day was the banana yoghurt bread. haha ;p

Thursday, April 17, 2008

Banana Yoghurt Bread


No school for me today :) So i got up early in the morning, with hands itching to bake. i got this yoghurt bread recipe from KWF's blog. i am really satisfied with the results. the bread turned out soft and fluffy. i following her hand kneading instructions here. it's really useful, especially since i do not own a bread machine. so all the kneading has to be done by my kenwood chef mixer and my HANDS! haha. it was really tough but it was all worth the while after seeing the final result.

some food photography here as well. i'm beginning to take interest in food photography as well :) i read about it some time back and learnt quite alot of tips from there. so i have been experimenting with my camera on how to take nice pictures of my bakes.

i shall let the pictures do the talking ;p

shape dough into smooth round balls

after the 2nd proof

egg wash; sprinkle with sesame seeds and melon seeds

nice brown colour

soft...

and fluffy

yum!

do give this recipe a try ;p

A Sneak Preview!


woohoo! i'll be getting a new blog soon :) with my own domain. yay! he has been persuading me to get my own domain so my site will look more exclusive and him being the pro in website designing (i'm a complete opposite haha) can help to dress my blog up ;p

so after much procrastination i agreed! and the domain was bought immediately :)

with that, we sat down and discussed very seriously about the new layout of my blog. haha it was so much fun. if only school projects were of this sort. he sketched the rough design on paint and ta-da. so pretty. hee.

here's a sneak preview for you guys. works are still in progress. only the template is up so far :) await my news okay!

Saturday, April 12, 2008

Healthy Steamed Banana Cake


i read about this steamed banana cake on little corner of mine's blog. original recipe taken from here. it seemed really simple and the reviews were great. and when i saw two very ripe bananas (with black spots on it already- great for making cakes!) in the kitchen this morning, i went ahead to try it :) you've got to try this cos it's a no hassle cake; plus its healthy too cos no butter needed. i used extra-virgin olive oil :p

oh and when i was preparing the ingredients, i realized i had no self-raising flour! so i searched google for a replacement of self-raising flour and i found the solution! so if you have no self-raising flour for this recipe, fret not! simply add 8g of baking power and 4g of salt to the required 150g of plain flour, also known as all-purpose flour :) that will do the trick!

i steamed them in batches cos my steamer was too small.

the cake turned out soft and fluffy, and nicely risen :) have a go at it too!

mash the bananas up!

steaming in process; it has risen quite a bit at this point!

just out of the steamer

yum!

soft and fluffy!

Here's the recipe using plain flour instead!

Steamed Banana Cake
Adapted from Amanda's Steamed Banana Cake.

Ingredients:

2 eggs
90g sugar
2 very ripe bananas, mashed
150g plain/AP flour
8g of baking powder
4g salt
1/8 tsp baking soda
75g of olive oil

Method:

1. Sift together plain flour, baking powder, baking soda, and salt. Set aside.

2. Whisk together eggs and sugar till ribbon stage. See the link for what a ribbon stage looks like.

3. Mix in mashed bananas, beat till well-combined.

4. Gently fold in flour mixture and oil, taking care not to deflate the air in the eggs and sugar mixture. (that's what helps the cake rise!)

5. Pour batter into muffin pan, lined with muffin cups.

6. Steam over high heat for 15mins or till an inserted skewer comes out clean

Monday, April 7, 2008

Green Tea Jewels


coating the dough with granulated sugar


-the jewels-

i call these green tea jewels cos the name just seems so apt for them! Especially after coating them with coarse granulated sugar. i had a list of things i had already wanted to bake. but i stumbled across lovescool's blog and the green tea sweets looked so pretty in green. since i had all the ingredients i needed for this recipe, i decided to bake this last weekend. quite a few have already tried it out and the different variations are really amazing. do have a look ok?

mine turned out a little on the dark side compared to those i have seen on lovescool's site.

oh, i tweaked the recipe a little. i was a little more generous with the matcha powder and i added an additional 30gm of ground almonds :)


the recipe...

Green Tea Jewels
Adapted from Lovescool's Green Tea Sweets

75g Confectioners sugar
150g Unsalted butter, cut into cubes
235g plain flour
4 medium sized egg yolks
2 tbsp Matcha powder
30g ground almonds
Granulated sugar (for coating)

Method:

  1. Preheat the oven to 180 deg C. Prepare your baking sheet. Whisk the confectioner’s sugar and green tea together in a bowl.
  2. Beat the butter with your electric mixer in a bowl, then add the green tea/sugar mixture & mix until smooth and light in colour.
  3. Add the flour and ground almonds and mix until well combined. Add the egg yolks and mix just until the eggs are fully incorporated.
  4. Form the dough into a disk and chill in the refrigerator until firm (about 30 mins).
  5. Remove from the refrigerator & roll the dough out. Cut the dough with a cookie cutter.
  6. Toss each cut cookie in a bowl of granulated sugar to coat. Place the sugar-coated cookie on your baking sheet. Bake for 13-15 minutes, or until slightly golden around the edges.